
How can I make something happen when the C-more touchscreen has not been used for some time?
Short answer: Use the C-more’s Event Manager to create an inactivity timer to trigger an event.
Let’s say I created a password-protected Admin Mode that allows access to restricted screens and objects on the touchscreen (see the Password-Protected Admin Mode Push Button article for how I did this). Now I want the Admin Mode to turn off if the authorized personnel has stepped away from the machine.
The Admin Mode should automatically turn off and the touchscreen should exit any restricted screens if the touchscreen has not been touched for say, ten minutes. The following is the process for accomplishing this.
Create the Event
- From the pull-down menus along the top of the C-more Programming Software, select Database > Event Manager Database. The Event Manager dialog opens.
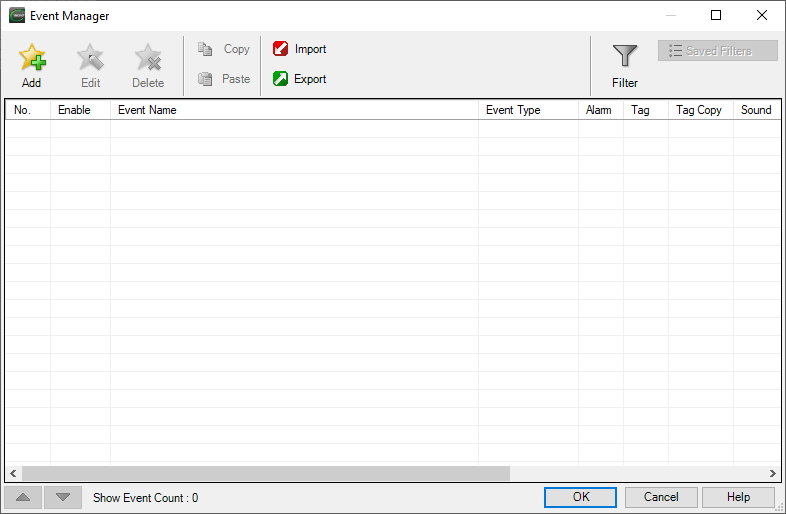
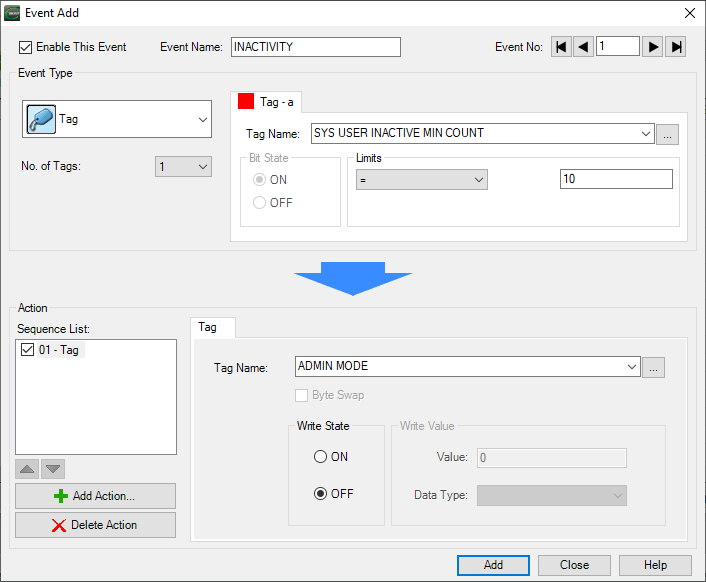
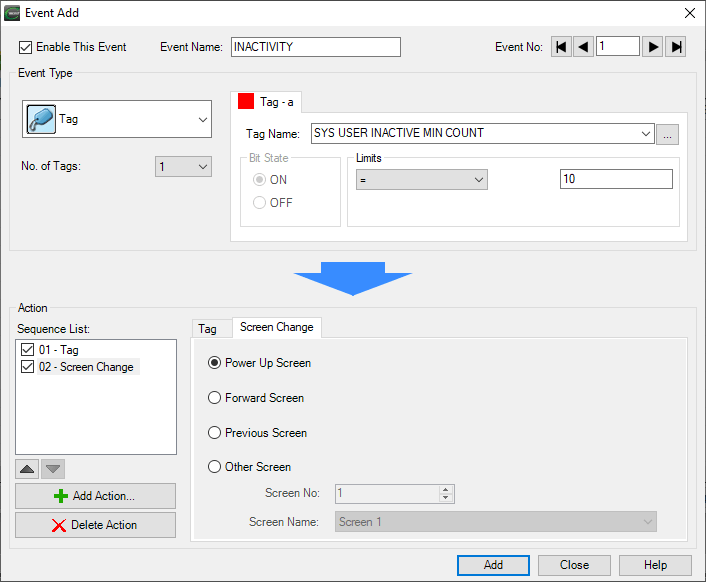
- Click the Add button on the Event Manager dialog. Note that the resulting Event Add dialog (Figure 2) has an Event Type section on the top half and an Action section on the bottom half. When the logic in the Event Type section is true, the action or actions in the Action section are triggered.
- On the Event Add dialog, enter “INACTIVITY” into the Event Name field.
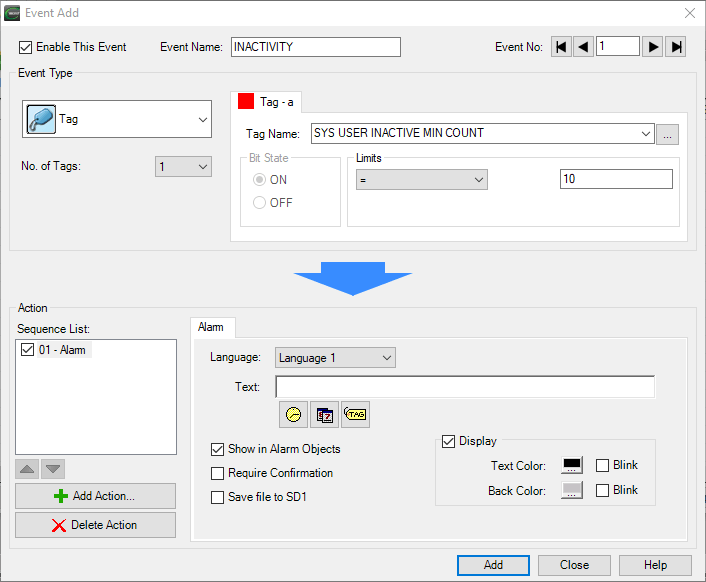
- On the Tag – a tab (Figure 3), select SYS USER INACTIVE MIN COUNT from the Tag Name list. This tag is a built-in system tag, you do not create it.
- Set the Limits to the equal symbol (=) and enter 10 in the unlabeled number field.
- Delete the default “01 – Alarm” action by selecting it in the Sequence List and clicking Delete Action.
So if the touchscreen has been inactive for 10 minutes, a yet-to-be-specified action will be taken.
Take action
You’ve defined the trigger. Now specify an action.
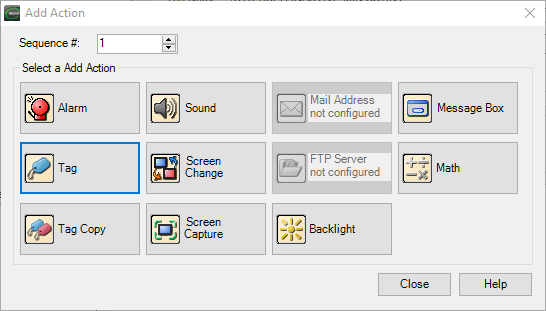
- Click the Add Action button on the bottom left of the Event Add dialog.
- On the resulting Add Action dialog, select Tag.
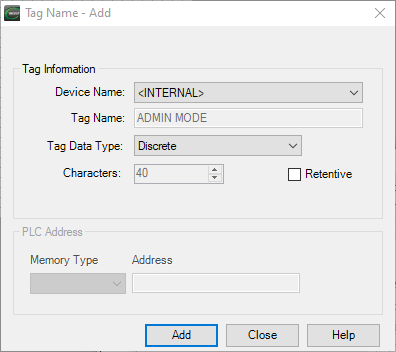
- On the Tag tab that appears in the Action area, select or create the ADMIN MODE tag that is to be reset by the inactivity timer. If a tag does not exist, the Tag Name – Add dialog will open after entering the name on the Event Add dialog and pressing Enter or clicking out of the Tag Name field. This tag can be an INTERNAL tag with no link to a PLC address.
- Set the Write State to OFF. Remember, ADMIN MODE should turn OFF upon this event.
- Click the Add Action button.
- On the resulting Add Action dialog, select Screen Change.
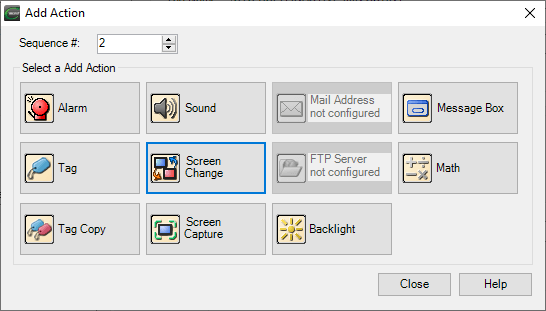
- On the Screen Change tab that appears on the Event Add dialog (Figure 8), leave it set to Power Up Screen for this example because that should be a screen safe for all users to access. Note that you can select other options including specifying a particular screen by number.
Only switch away from certain screens
If you want to switch to a different screen only if a certain screen or screens is the current screen when the inactivity timer expires, you would probably create a new event so resetting ADMIN MODE always occurs upon inactivity, but screen changes only occur when the current screen is a restricted screen, or whatever your criteria is.
- Duplicate the INACTIVITY event by selecting it in Event Manager, clicking the Copy button, then clicking the Paste button.
- Select the new event and click the Edit button, or just double-click the event.
- On the Event Edit dialog for the new event, change the Event Name to INACTIVITY – SCREEN CHANGE.
- Change the No. of Tags to 2. Leave the logic as “a AND b” (Figure 9).
- On the Tag- b tab that appears, select SYS CURRENT SCREEN NUMBER from the Tag Name list. This tag is a built-in system tag, you do not create it.
- Set the Limits to the equal symbol (=) and the unlabeled number field to the restricted screen number from which you want to switch.
- Don’t forget to remove the SYS CURRENT SCREEN NUMBER logic from the original INACTIVITY EVENT if it’s present,
Note that there can be a maximum of 4 tags. So if there are several restricted screens to which this logic should apply, consider moving the restricted screens to a range that is easy to deal with logically. For example, have all the restricted screens (and only restricted screens) be numbered 20 or higher so the logic for Tag – b can be SYS CURRENT SCREEN NUMBER >= 20. See Figure 9.

Involving the PLC
If you need to involve PLC logic in the action, you can add another Tag action to the event.
- Click the Add Action button on the Event Edit dialog.
- On the resulting Add Action dialog, select Tag.
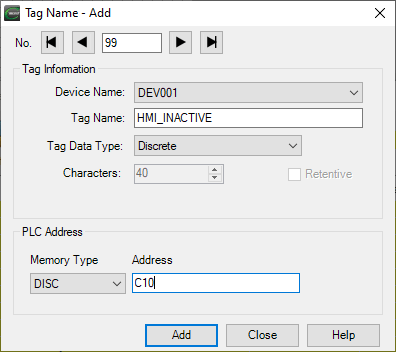
- On the Tag tab that appears, create a tag named HMI INACTIVE. This tag cannot be an <INTERNAL> tag since the PLC needs to access it. Select the PLC device for Device Name, typically DEV001. Set Tag Data Type to Discrete, Memory Type to DISC, and PLC address to the address of your choosing. Click the Add button.
- Back on the Event Edit dialog, set the Write State to ON.
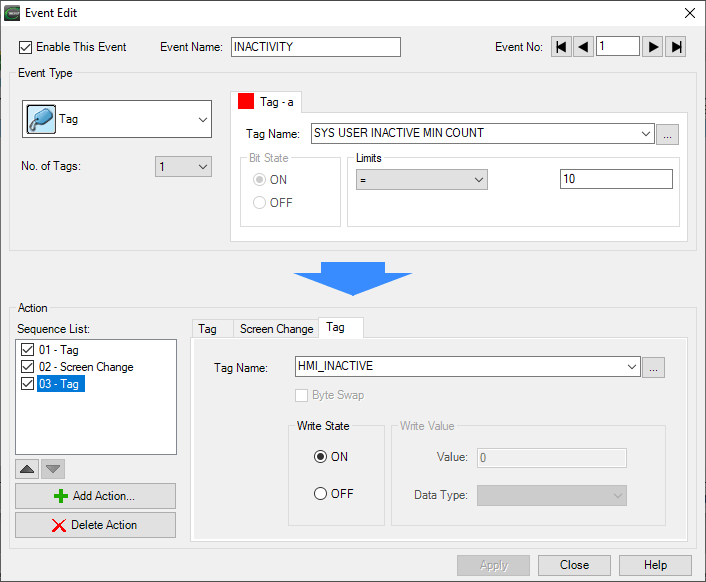
- Click Apply then Close.
In PLC logic, the address assigned to the HMI INACTIVE tag can drive further actions like shutting down a hydraulic pump. Or perhaps setting the HMI INACTIVE to ON is the only action for this event and the PLC looks at this information AND whether any hardware buttons or switches have been used before taking some action.
Important: After taking the action or deciding not to take further action, the PLC must reset the bit assigned to HMI INACTIVE. Otherwise, the bit will remain “ON” when the screen is no longer inactive and there would be no off-to-on transition when it becomes inactive again. This may or may not affect your PLC logic.
Similarly, you could create a tag linked to a PLC address that represents the inactivity of hardware controls like pushbuttons and selector switches. This tag could be used in the logic in the Event Type area of an event.
C-more Example Program
- Download an example program showcasing the techniques described in this article here:
ADMIN_MODE_example_C-more_v6.70_r2.zip
- Open the downloaded file and extract the .eap9 file from the .zip file to the project folder of the C-more Programming Software.
- Open the .eap9 file in the C-more Programming Software.
- Try it out by clicking the Simulate toolbar button or selecting File > Simulation from the pull-down menus.
- Ring the bells, blow the whistles. Specifically, turn on the Admin Mode (password is my debit card pin number, 1234), go back to the Home screen, note a Radio Button object is now visible, wait 15 seconds and see the object become invisible again as the inactivity timer expires.
Note: this example program also contains elements related to the Password-Protected Admin Mode Push Button article.
CTRLfreak.io is not affiliated with AutomationDirect.