
I wanted to have a password-protected pushbutton that would enable an administrative mode on a C-more touchscreen HMI. This admin mode would grant the user access to restricted objects and screens without having to password-protect each of the objects individually. Password-protecting the pushbutton is easy. The challenge is allowing the user to disable the mode without having to enter the password again.
I typically set and reset behavioral modes with a momentary Indicator Button object on the HMI driving a PONOFF instruction in a BRX PLC program. When programming a CLICK PLC, I use flip-flop logic in lieu of the PONOFF instruction. In either case, I use an internal relay (bit) for the pushbutton press and another that is on when the mode is on. The PLC program then changes behavior depending on which mode(s) are active.
However, a C-more pushbutton can only be password-protected if the button’s Object Type is “Toggle” (versus “Momentary”). Being a “toggle” type of button means the PONOFF/flip-flop ladder logic would not apply; the button object takes care of this logic itself. If fact, no ladder logic is necessary. And as you’ll see, a PLC address does not even need to be associated with the tag for the button on the HMI.
Password protecting the pushbutton means a password must be entered every time the button is pressed. Even when toggling it off. This is an inconvenience to the user I wanted to avoid.
Solution
The solution is to have two button objects: one password-protected button to enable Admin Mode and an unprotected button to disable Admin mode. Then use the Visibility property to display only one at a time to make them look like a single button. Here are my steps:
- Open the project in the C-more Programming Software and insert an Indicator Button object onto the screen.
- Set the Indicator Button’s Object Type to Toggle.
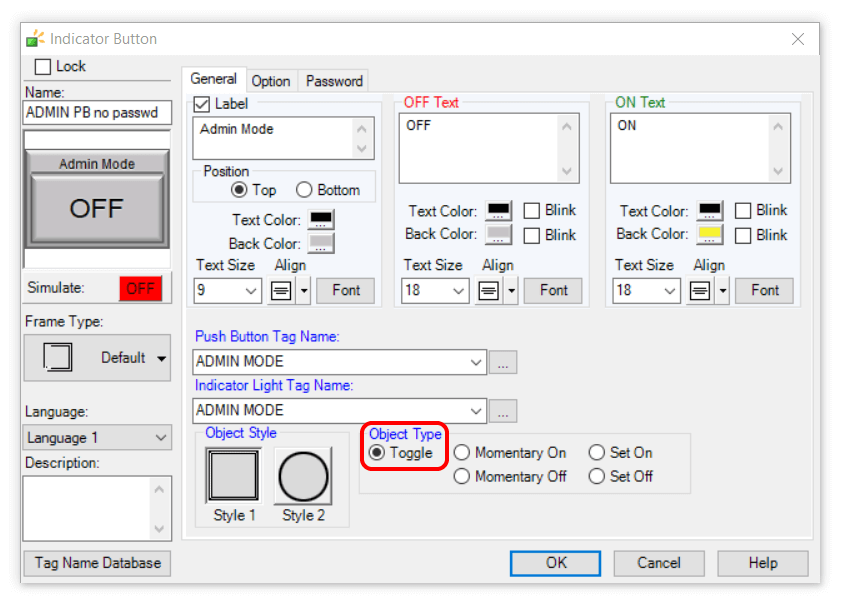
- Enter “ADMIN MODE” for both the Push Button Tag Name and the Indicator Light Tag Name.
- On the resulting Tag Name – Add dialog, set Device Name to “<INTERNAL>” and click Add.
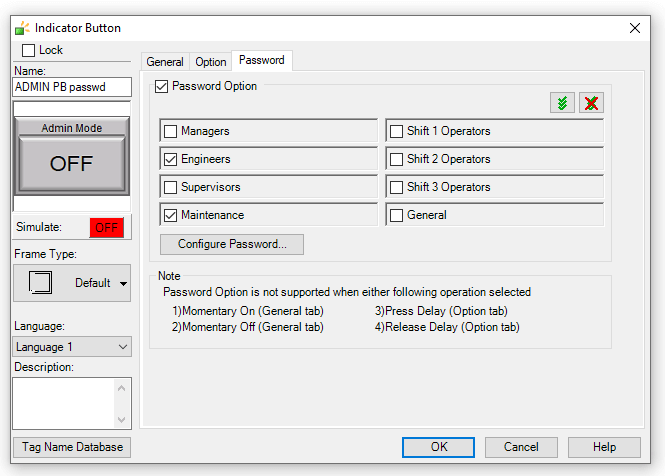
- Back on the Indicator Button dialog, go to the Password tab, enable the Password Option checkbox, and configure the passwords as necessary, then click OK.
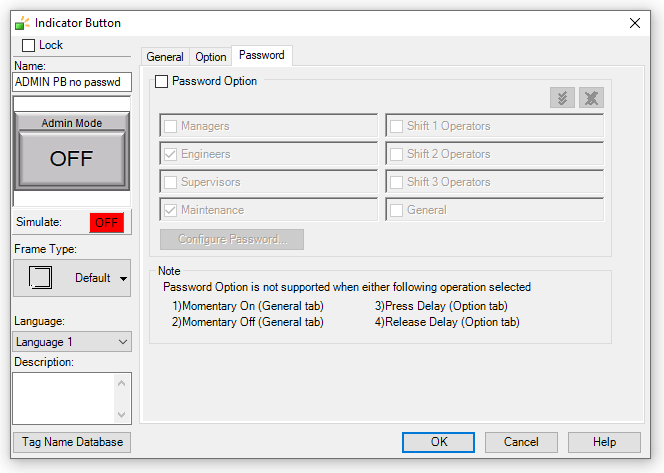
- Copy the Indicator Button object by selecting it, pressing CTRL+C, then pressing CTRL+V.
- Double-click the new copy of the indicator button. Uncheck the Password Option checkbox on the Password tab of the resulting Indicator Button dialog.
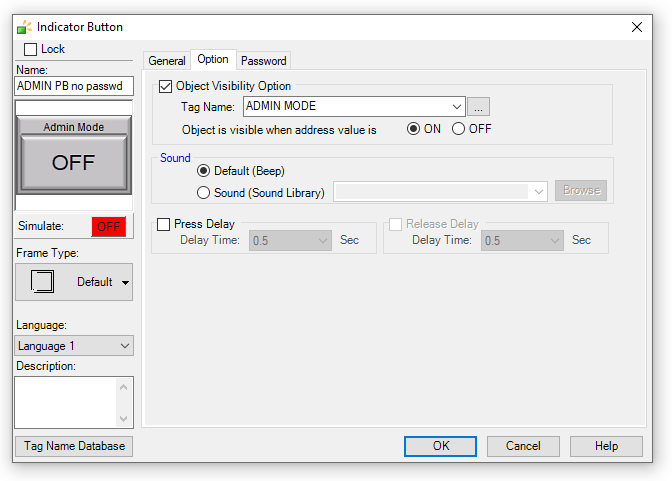
- Set the Object Visibility Option checkbox on the Option tab and select the ADMIN MODE tag for Tag Name. Set Object is visible when address value is ON. Click OK.
- Position the copy directly over the original indicator button. Make sure the copy’s Layer number is less than the original. It should be by default since it is a “newer” object. Objects with a lower Layer value will display over the top of objects with a higher value.

That’s it.
Now controlling access is just a matter of setting the Object Visibility Option of objects such as screen change buttons that lead to restricted screens or numeric entry objects for configuration variables so that these objects are only visible when tag ADMIN MODE is ON.
C-more Example Program
- Download an example program created using the steps above here:
ADMIN_MODE_example_C-more_v6.70_r2.zip
- Open the downloaded file and extract the .eap9 file from the .zip file to the project folder of the C-more Programming Software.
- Open the .eap9 file in the C-more Programming Software.
- Try it out by clicking the Simulate toolbar button or selecting File > Simulation from the pull-down menus.
- Poke around, kick the tires. Specifically, go to the Admin screen, click the Admin Mode pushbutton, enter the password (1234), see the button indicate Admin Mode is ON, click the button again and see that Admin Mode turns OFF without entering the password.
Note: this example program also contains elements related to the C-more Inactivity Timer article.
To monitor or reset Admin Mode via the PLC (optional)
- Open the Tag Name Database in the C-more Programming Software.
- Edit the ADMIN MODE tag.
- On the Tag Name – Edit dialog, change the Device Name value to the one for your PLC and assign a PLC memory address such as an internal relay (bit) to the tag.
- Click Apply, Close, etc.
- The Admin Mode button, and therefore the Admin Mode itself, can now be turned off in the ladder logic by using a Reset instruction on the bit assigned in step 3.
So far, I have not had a reason to use the Admin Mode pushbutton bit in the PLC logic at all. I simply use that tag to control the visibility of restricted items on the screen, like numerical entry objects and screen change objects. For example, a numerical entry object can be displayed over the top of a numerical display object when Admin Mode is on. No PLC code necessary. Even the inactivity timer that resets the Admin Mode is entirely in the C-more program.
CTRLfreak.io is not affiliated with AutomationDirect.com